Some of the most common risks are because of unattended computers, weak passwords, and poor information management practices. Hackers look for the weakest target and tunnel into a business from easy sources, like tablets or cell phones.Using smart encryption software can remediate this threat and vulnerability, making it difficult for competitors or rookie hackers to penetrate your device. However, software alone is not enough to prevent Macs from being hacked. It is the Mac user who has the authority and resources to save it from potential penetration. The top 10 ways to prevent your Mac from being hacked is discussed below. Following all these tips will surely make your Mac hack-resistant. As a word of caution, before starting on the below processes, be sure to back-up your system first.
1. Don’t Surf or Read Mail Using the Administrator Account
Create a non-administrator user in the Accounts pane of System Preferences and use this account for everyday tasks. Only log in with an administrator account when you need to perform system administration tasks.
2. Use Software Update
Regularly applying system updates is extremely important. For Internet-connected systems: Open the Software Update pane in System Preferences. Ensure that “Check for Updates” is enabled, and set it to “Daily” (or the most frequent setting). There is a command line version available as well, called Software Update. Read its main-page for more details.
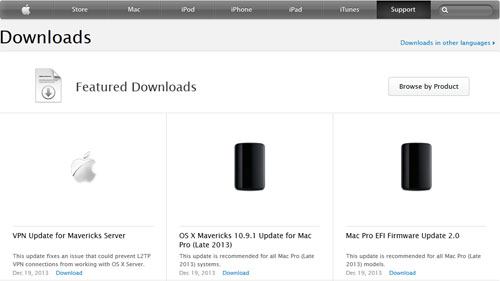
For systems not connected to the Internet: Retrieve updates regularly from www.apple.com/support/downloads. Be sure to verify that the SHA-1 digest of any download matches the digest published there, using the following command: /usr/bin/openssl sha1 download.dmg
3. Account Settings
You want to disable Automatic Login. To do this, open the Accounts pane in System Preferences. Click on “Login Options.” Set “Automatic login” to “Off.” Set “Display login window as” to “Name and password.” To disable Guest Account and Sharing, select the Guest Account and then disable it by unchecking “Allow Guest to log in to this computer.” Also, uncheck “Allow guests to connect to shared folders.”
4. Secure Users’ Home Folder Permissions
To prevent users and guests from perusing other users’ home folders, run the following command for each home folder: sudo chmod go-rx /Users/username
5. Firmware Password
Set a firmware password that will prevent unauthorized users from changing the boot device or making other changes. Apple provides detailed instructions for Leopard (which apply to Snow Leopard) here: http://support.apple.com/kb/ht1352
6. Disable IPv6 and AirPort when Not Needed
Open the Network pane in System Preferences. For every network interface listed:
If it is an AirPort interface but AirPort is not required, click “Turn AirPort off.” Click “Advanced.” Click on the TCP/IP tab and set “Configure IPv6:” to “Off” if not needed. If it is an AirPort interface, click on the AirPort tab and enable “Disconnect when logging out.”
7. Disable Unnecessary Services
The following services can be found in /System/Library/LaunchDaemons. Unless needed for the purpose shown in the second column, disable each service using the command below, which needs the full path specified: sudo launchctl unload -w System/Library/LaunchDaemons/com.apple.blued.plist
com.apple.blued.plist – Bluetooth com.apple.IIDCAssistant.plist – iSight com.apple.nis.ypbind.plist – NIS com.apple.racoon.plist – VPN com.apple.RemoteDesktop.PrivilegeProxy.plist – ARD com.apple.RFBEventHelper.plist – ARD com.apple.UserNotificationCenter.plist – User notifications – com.apple.webdavfs_load_kext.plist – WebDAV – org.postfix.master – email server
Other Services Can be found here: /System/Library/LaunchAgents and can be disabled the same exact way as the items listed above.
8. Disable Setuid and Setgid Binaries
Setuid programs run with the privileges of the file’s owner (which is often root), no matter which user executes them. Bugs in these programs can allow privilege escalation attacks. To find setuid and setgid programs, use the commands:
find / -perm -04000 -ls find / -perm -02000 -ls
After identifying setuid and setgid binaries, disable setuid and setgid bits (using chmod ug-s programname) on those that are not needed for system or mission operations. The following files should have their setuid or setgid bits disabled unless required. The programs can always have their setuid or setgid bits re-enabled later, if necessary.
/System/Library/CoreServices/RemoteManagement/ARDAgent.app/Contents/MacOS/ARDAgent – Apple Remote Desktop /System/Library/Printers/IOMs/LPRIOM.plugin/Contents/MacOS/LPRIOMHelper – Printing /sbin/mount_nfs – NFS /usr/bin/at – Job Scheduler /usr/bin/atq- Job Scheduler /usr/bin/atrm – Job Scheduler /usr/bin/chpass – Change user info /usr/bin/crontab – Job Scheduler /usr/bin/ipcs – IPC statistics /usr/bin/newgrp – Change Group /usr/bin/postdrop – Postfix Mail /usr/bin/postqueue – Postfix Mail /usr/bin/procmail – Mail Processor /usr/bin/wall – User Messaging /usr/bin/write – User Messaging /bin/rcp – Remote Access (Insecure) /usr/bin/rlogin – /usr/bin/rsh /usr/lib/sa/sadc – System Activity Reporting /usr/sbin/scselect – User-selectable Network Location /usr/sbin/traceroute – Trace Network /usr/sbin/traceroute6 – Trace Network
9. Configure and Use Both Firewalls
The Mac system includes two firewalls: the IPFW Packet-Filtering Firewall, and the new Application Firewall. The Application Firewall limits which programs are allowed to receive incoming connections. It is quite easy to configure the Application Firewall. Below, I mention how to configure Mac’s Application firewall. Configuring the IPFW Firewall requires more technical expertise and cannot be fully described here. It involves creating a file with manually written rules (traditionally, /etc/ipfw.conf), and also adding a plist file to /Library/LaunchDaemons to make the system read those rules at boot. These rules depend heavily on the network environment and the system’s role in it.
How to Configure Application Firewall in Mac
In only Four steps you can easily configure the Application Firewall in Mac.
Select System Preferences from the Apple Menu
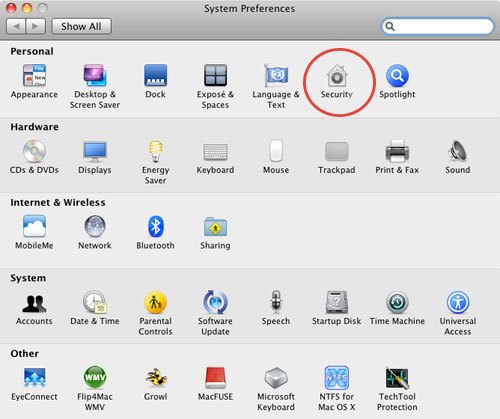
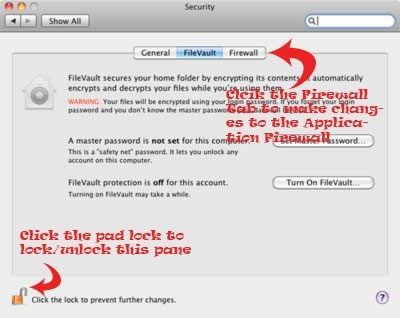
From the System Preferences Pane select Security. Then click on the Firewall Tab. Ignore the other Tabs (General and Firevault ). 3. On the Firewall tab, you may need to unlock the pane, if it is locked. To unlock, click on the small pad lock on lower left corner and enter your Administrator Username and Password.
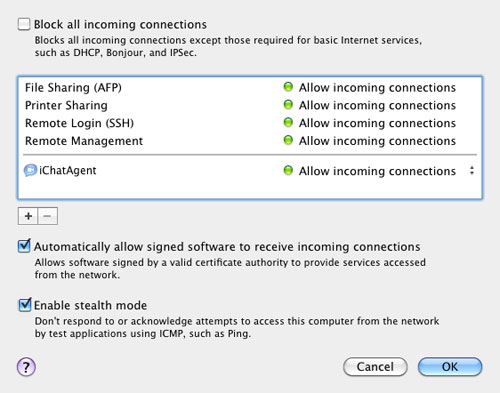
Click Start to enable Mac’s Application Firewall. The green light beside Firewall Status and the ON notification will ensure that the Firewall is running smoothly. You can further customize the Firewall configuration by clicking on the Advance button on the right side.
There are three Advance option in the Firewall Tab
Block All Incoming Connections: Blocking all incoming connections will disable most of the sharing services like File Sharing, Screen Sharing and others. It will only allow basic internet service. Keeping it checked or unchecked depends with on the user.
Automatically allow signed software to receive incoming connections:I prefer to keep this option unchecked. This will automatically add software signed by “any” valid authority to the allowed list of Software rather than prompting the users to authorize them.
Enable stealth mode: I always keep this option checked. This prevent your Mac from responding to ping requests and port scans
10. Safari Preferences
Safari will automatically open some files by default. This behavior could be leveraged to perform attacks. To disable, uncheck “Open safe files after downloading” in the General tab. Unless specifically required, Safari’s Java should be disabled to reduce the browser’s attack surface. On the Security tab, uncheck “Enable Java.”Also, private browsing in Safari is a great way to stop hackers from picking up bread crumbs and using them against you later.
Bonus Tip: Disable Bluetooth and Airport
The best way to disable Bluetooth hardware is to have an Apple-certified technician remove it.If this is not possible, disable it at the software level by removing the following files from /System/Library/Extensions: IOBluetoothFamily.kext IOBluetoothHIDDriver.kext The best way to disable AirPort is to have the AirPort card physically removed from the system.If this is not possible, disable it at the software level by removing the following file from /System/Library/Extensions: IO80211Family.kext If followed carefully, the above mentioned tips can outdo a hacker’s technology to compromise your Mac. However, as technology advances, hacker use ever-more innovative ways to penetrate your Mac. If you know other ways to hack into a Mac, please share with us in the comments below!


